Bridges in 3D printing: why long ones can sag
A bridge is a flat ceiling a 3D printer prints in mid-air, over a gap. Short bridges usually print clean. Long ones can sag and leave a rough, droopy ceiling. Keep spans short, split a long one with a pillar or a rib, or turn the part.
Last updated 11 November 2026.
Where Makerlane is today
Makerlane is a 3D printing service in Singapore. Upload a file at makerlane.sg to see your print price, with no sign-up.
What is a bridge in 3D printing?
A bridge is a flat ceiling over a gap, such as the top of a slot or a window in a part printed lying flat. The width of the gap is called the span. Without supports, it has nothing under it, so the printer lays lines straight across the gap, in mid-air, resting only on the two ends. People call this a bridge, or bridging.
Makerlane designed the test block on this page and sliced it. Slicing turns a model into the lines a printer would follow. In our slice at 0.2 mm layers, the slicer marks the lines across each gap as Bridge. Every one runs straight across and rests on the wall at both ends.
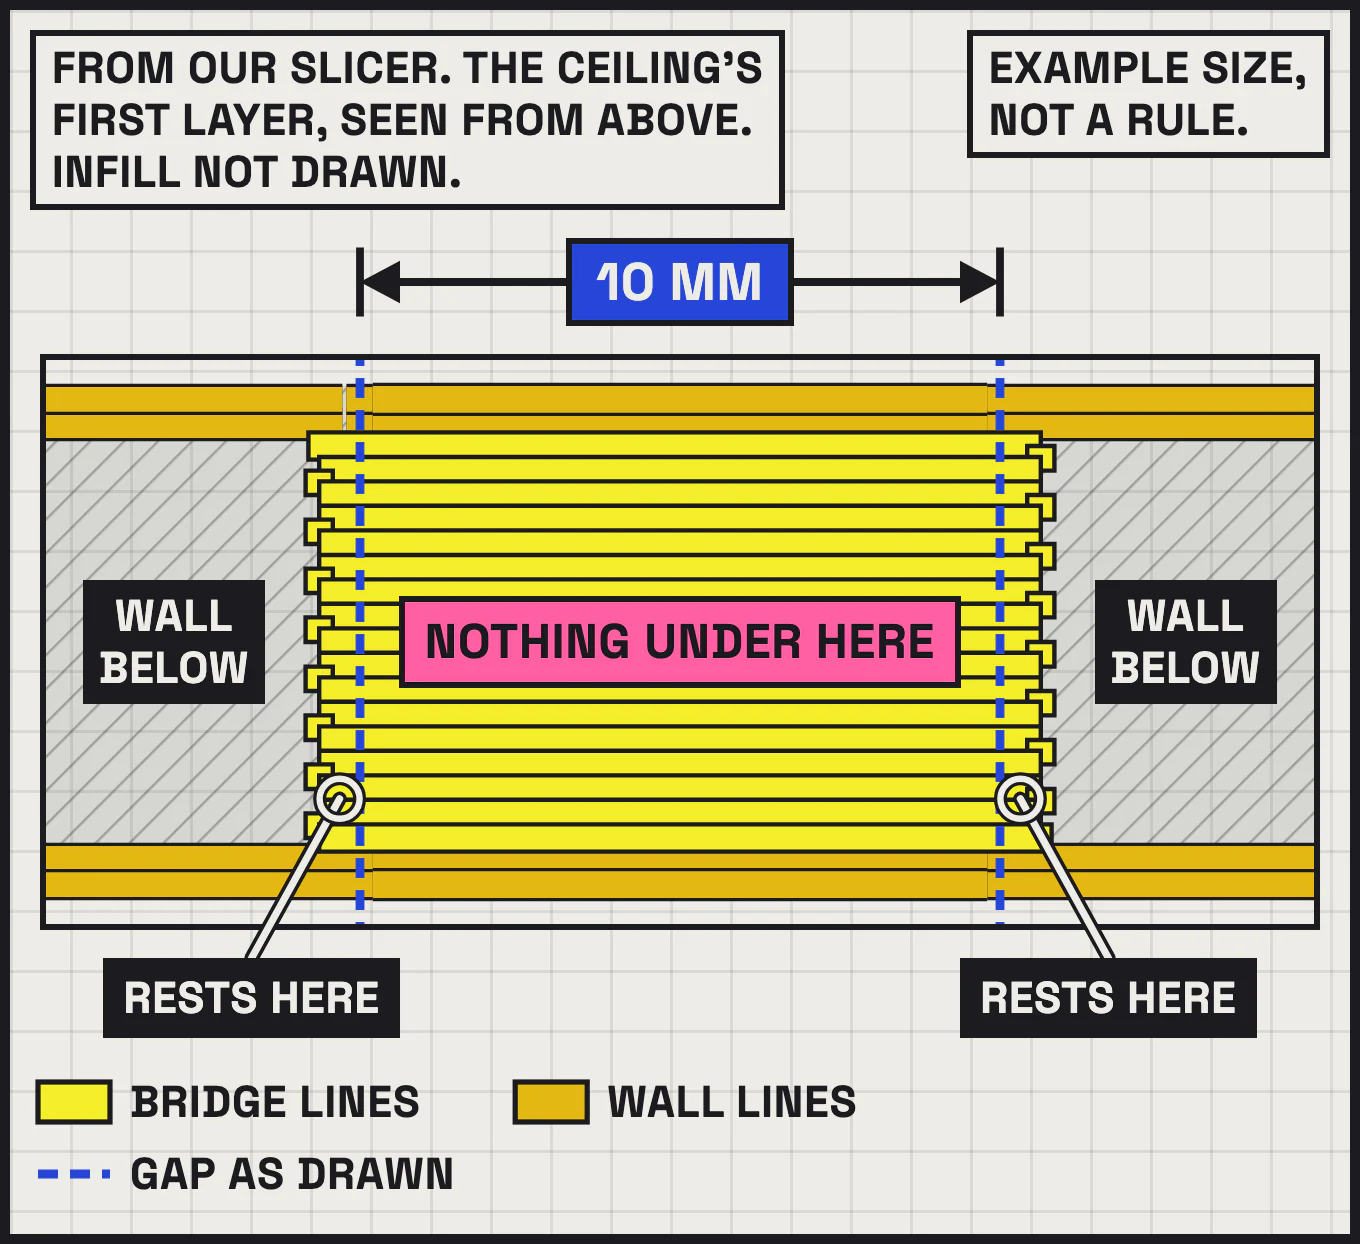
A slice is a plan, not a print. Every picture on this page is a 3D render or a drawing, not a photo, and no print is shown.
Why do long bridges sag?
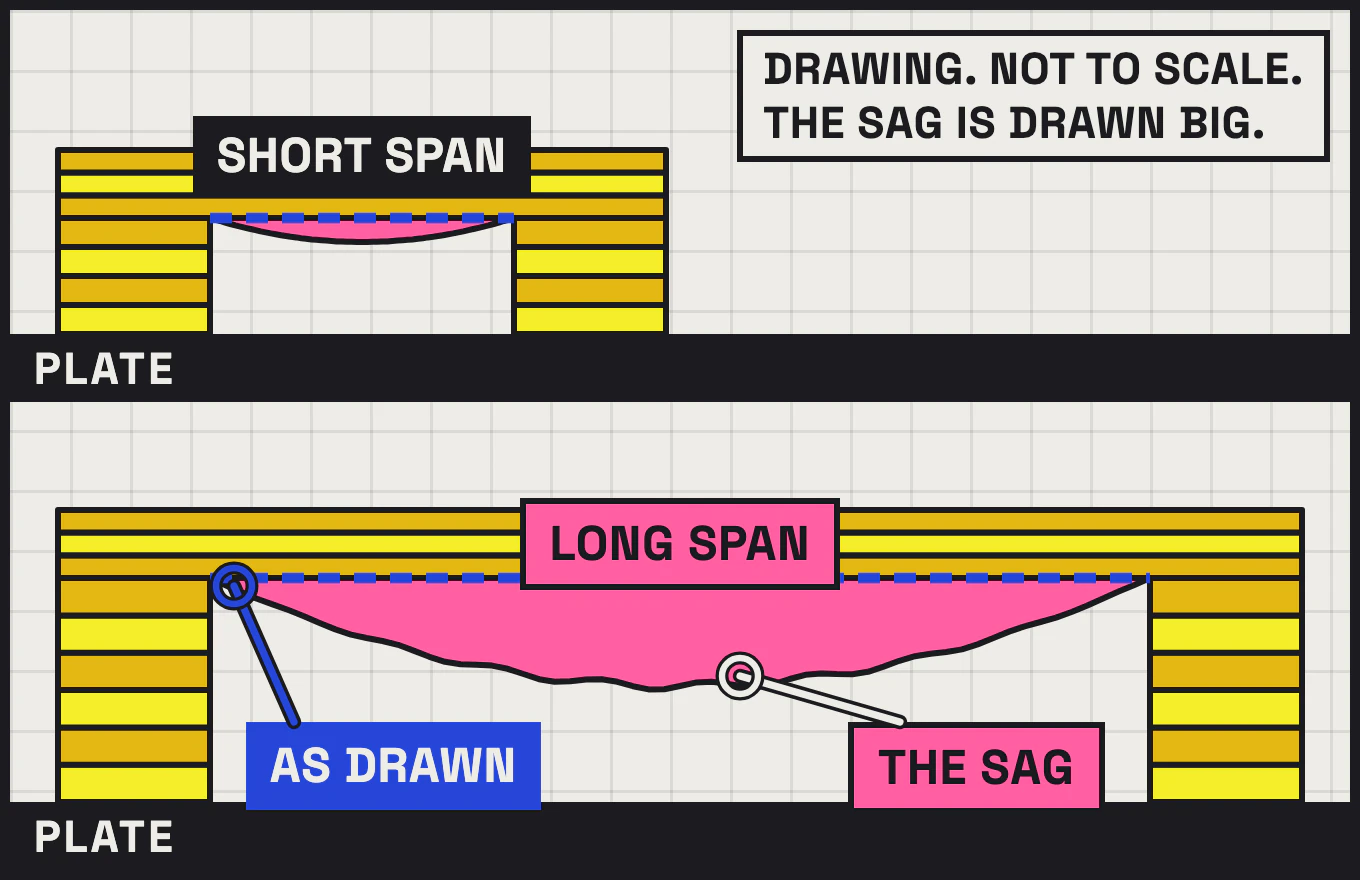
Fresh plastic is soft, with nothing under the middle. Across a long gap it can droop, often leaving a rough ceiling. Longer spans can sag more.
A slice cannot show a sag, so the sag on this page is a drawing, drawn big.
How long can a bridge be in 3D printing?
It depends on your printer, your plastic and your settings, so there is no one length that always works. Short spans usually print clean, and longer ones can sag more.
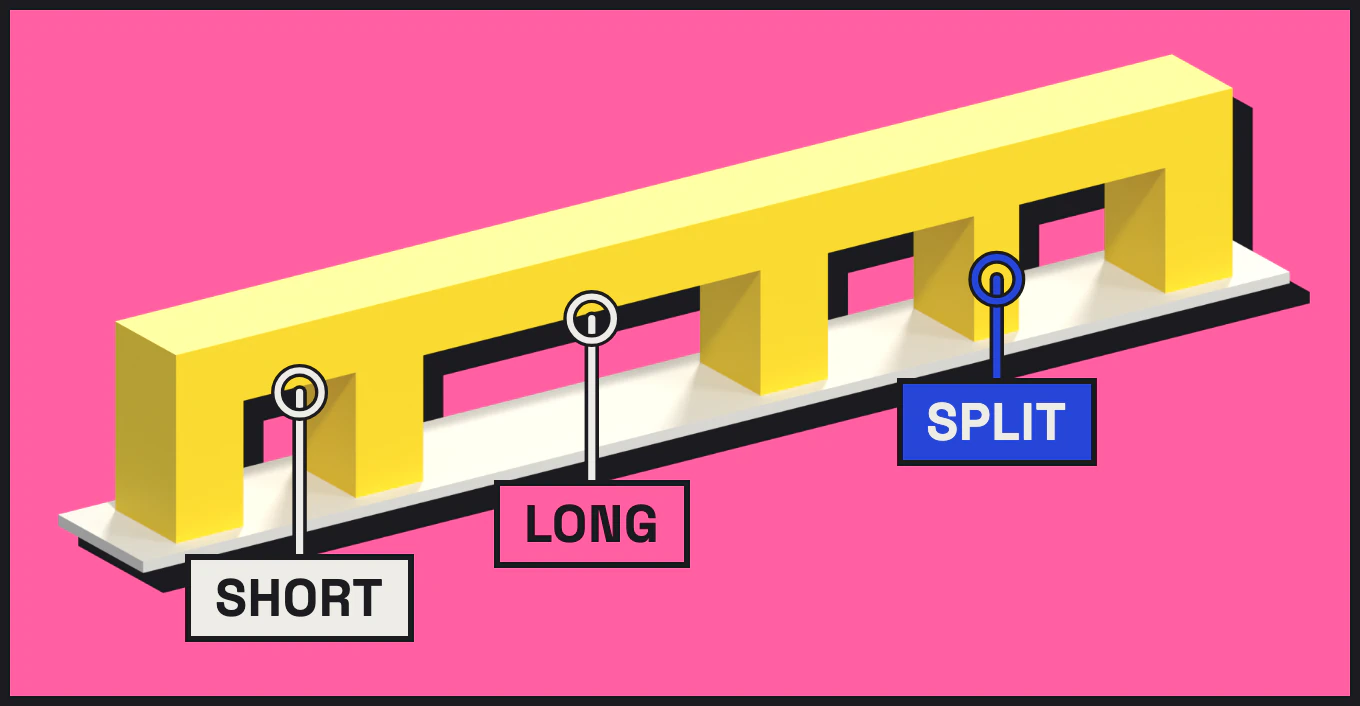
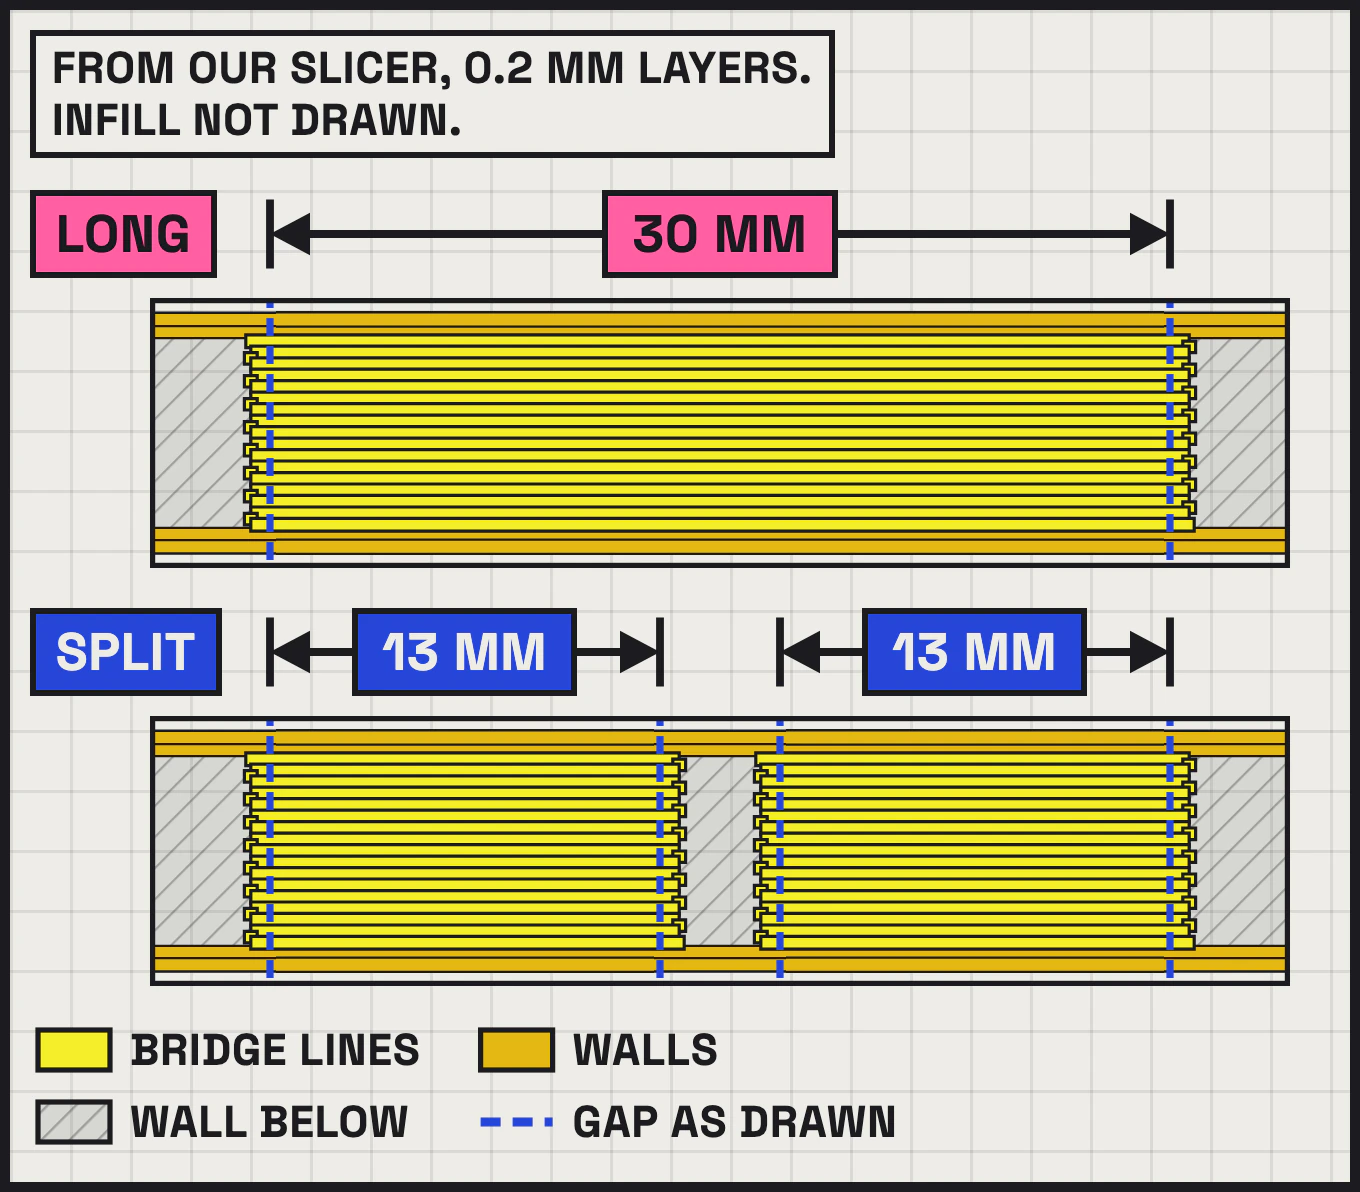
The test block has three openings. They are 10 mm wide, 30 mm wide, and 30 mm wide split by a 4 mm pillar into two spans of 13 mm. These sizes are examples, not a rule. The block was sliced but not printed.
To find your own limit, print a small block with a few spans of different widths, then look at the underside of each ceiling.
How do I fix a long bridge?
Make the span shorter. If it has to be long, split it with a pillar (a post) or a rib (a thin wall). Then one long bridge becomes two shorter ones.
In the test block, a 4 mm pillar turns one 30 mm opening into two spans of 13 mm. A pillar usually helps, but a clean ceiling is not certain, so check the result on your printer.
You can also turn the part so the opening stands upright, which usually leaves no flat ceiling to bridge. Check the rest of the part in its new position, because another face can become a ceiling.
What slicer settings affect bridges?
Slicers usually have their own bridge settings, so check yours. Ours has a bridge speed and settings called Bridge flow and Thick bridges. Cooling can matter too, so look for fan settings.
In our slice, bridge speed is set lower than outer wall speed: 50 mm/s against 200 mm/s, and Thick bridges is off.
Our slicer's help text for Thick bridges says that with it on, bridges are more reliable and can cover longer distances, but may look worse. With it off, bridges look better but are reliable only over shorter distances. The help text names no distance. For Bridge flow, the help text says to lower the value slightly, to put less plastic in a bridge and improve sag.
Do I need supports under a bridge?
It depends on the span, your printer and your settings. Supports under a long ceiling can help, but they use plastic and time and leave small marks where they are removed. At Makerlane, the upload check tells you when overhangs need supports. Supports are in the print price.
What should I do next?
Measure each flat-topped opening in a part printed lying flat. If one is wide, shorten it, add a pillar or a rib, or turn the part. Then look for the bridge lines in your slicer's preview, if it marks them.
If someone else prints your file, you usually do not choose its bridge settings, so the shape of the part is what you control. At makerlane.sg, the upload check suggests a better side when one helps, and Pro mode lets you turn the model yourself.
The print price you lock never goes up. You see the handling fee and delivery before you pay, and nothing is added after you pay. Checked your spans? See your print price in seconds at makerlane.sg.